Hello Friend Cardmaking Tutorial Color Throwdown #CTD445
Hi there,
Today I'm participating in the Color Throwdown challenge (http://colorthrowdown.blogspot.co.uk) #colorthrowdown #ctd445 with a focus on the colours navy, light pink, gold and white.

Please check out the blog, it's a fantastic challenge and a great way to stretch yourself, or gain some ideas from other papercrafters. I really loved the colour combination this week, and couldn't resist playing along! I've created a card simply saying 'Hello Friend' using acrylic paint, some foil and some die-cutting techniques. You could achieve something similar without a die-cutting machine; I've got some ideas for you below. Please take a look at the video below and, if you like it, head over to YouTube to like the video and subscribe to my channel.
Supplies used:


I found this challenge a lot of fun, and really loved the effect of this colour combination! I hope you were inspired, too, and will head over to the Color Throwdown blog and try your hand at this challenge, too! Thanks for visiting, and I'll see you soon with another tutorial.
Until next time,
Amy x
Today I'm participating in the Color Throwdown challenge (http://colorthrowdown.blogspot.co.uk) #colorthrowdown #ctd445 with a focus on the colours navy, light pink, gold and white.

Please check out the blog, it's a fantastic challenge and a great way to stretch yourself, or gain some ideas from other papercrafters. I really loved the colour combination this week, and couldn't resist playing along! I've created a card simply saying 'Hello Friend' using acrylic paint, some foil and some die-cutting techniques. You could achieve something similar without a die-cutting machine; I've got some ideas for you below. Please take a look at the video below and, if you like it, head over to YouTube to like the video and subscribe to my channel.
- Royal & Langnickel Crafter's Choice Acrylic Paint in English Rose and Prussian Blue (check your local branch of The Works or Ryman)
- Royal & Langnickel 22 wash brush in gold taklon
- 300 gsm Super Smooth White Card from Samuel Taylors
- 220 gsm White Card from Poundland
- Sara Signature English Country Garden Collection A6 Stamp Set - Beautiful Leaves
- Papermania dye-based ink in navy
- First Edition Gold Foil
- Double-sided tape in narrow and standard widths
- Xcut A6 Ditsy Anchors embossing folder
- Xcut Nesting Hearts dies
- Xcut Tags and Bookplates dies
- Dusky pink braided rope
- Sanding block
- White gel pen
- Gold gel pen
- Trimcraft Couture du Jour dies (With Love die)
- Stitched rectangle dies from The Works
- Stitched heart dies from The Works
- Trendy Blue Lifestyle 12x12 pad from The Works
- Dusky pink lace, from a bundle at my local haberdashery store
- Pink and white baker's twine
- Scissors
- Tape runner
- Foam tape and pads
- Tonic Nuvo glue pen
- Martha Stewart scoring board
- Tonic Studios guillotine
- We R Memory Keeper 1-2-3 Punch Board
- Stamp positioning tool or acrylic block

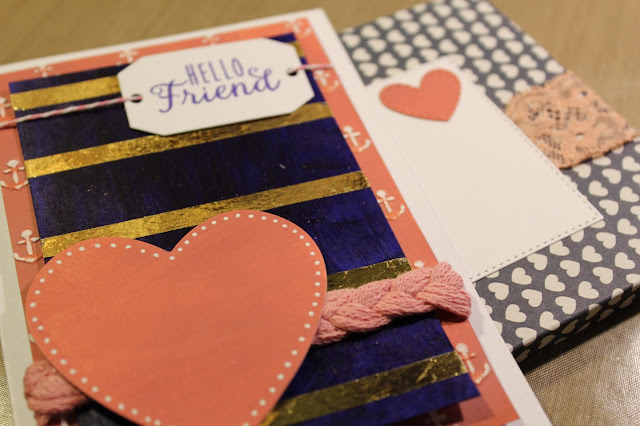
I started out by cutting an A4 piece of 300 gsm white card in half then scoring it to make an A6 card blank. I cut two matts from the spare cardstock, each half an inch smaller than the last in both height and width. The smallest of these, I coated with two coats of the Prussian Blue acrylic paint.

In the video, you can see I first covered this with strips of standard width double sided tape, but I then decided this didn't look right, so remade the panel and used thinner tape spaced wider apart. The tape was covered with the gold foil to provide a shiny and very striking element to the card front, while the painted panel provided more subtle texture. I painted the larger panel with the English Rose paint, just around the edges, then embossed this with a ditsy anchors embossing folder. I sanded the embossed elements to make them stand out and provide a shabby yet modern look to the card.

I die-cut a bookplate from white card and stamped the sentiment 'Hello Friend' in navy ink three times to provide a bold sentiment. I threaded baker's twine through the bookplate and attached it to the card front. I also wrapped braided pink rope around the panel towards the bottom. I painted some more white card with the English Rose paint and die-cut a heart, some smaller stitched hearts and the sentiment 'with love'. I drew white dots around the edge of the heart and assembled everything with foam pads and tape adhesive. Some hearts and the sentiment were then glued to the inside of the card.

If you don't have these dies, or a die-cutting machine, you could use patterned paper instead of embossing for the background. You could hand-write or stamp the sentiment. For the heart, you could print out a heart shape, cut it out and then paint the card. A simple rectangle of card with two holes punched in it could be effective instead of the bookplate.

To create a matching envelope, I used a heart patterned paper in navy and white and the punch board. The card was cut to 8" 3/8 and lined up to the 3" 1/2 mark to punch. I created a box envelope because the card was very dimensional!

I wrapped dusky pink lace around the envelope as I felt this was more effective than the baker's twine, although it matched the card design less. I used the last heart on a stitched rectangle panel, die-cut from thinner cardstock, and wrote the name of the recipient in gold gel pen.

I found this challenge a lot of fun, and really loved the effect of this colour combination! I hope you were inspired, too, and will head over to the Color Throwdown blog and try your hand at this challenge, too! Thanks for visiting, and I'll see you soon with another tutorial.
Until next time,
Amy x


Comments
Post a Comment